
by Allan Holtzmann
Cloud Architecture on a Budget
We have all heard repeatedly about the “cloud”, and how it can do amazing things for our IT efforts, reliability, and budget. Unfortunately, the details on how to accomplish improvements in all three areas are often sparse. It is easy enough to migrate your website to a cloud platform, but making your website resilient, reliable, and cost-effective at the same time is another matter altogether.
For this example, we will be looking at running an open source WordPress installation on Amazon Web Services. There are several different ways to implement WordPress on AWS; from LightSail, to a single EC2 server, to a load-balanced, auto-scaling web cluster with an external database backend using Elastic Beanstalk, all to the way up to a powerhouse design utilizing Amazon’s purpose built infrastructure components: Auto Scaling EC2 web servers, leveraging Elastic Load Balancing, accelerated by CloudFront CDN, powered by an Aurora database cluster, and Route53 managed DNS and guarded by AWS Shield DDoS protection, and Web Application Firewall security services.
As you can imagine, the budget and the complexity for each of these solutions grows proportionally with their resiliency. You can build an extremely efficient, and cost-effective WordPress site on a single EC2 instance, or LightSail shared host. You can also watch in horror as your website is taken offline by the demand of the first sizable flood of visitors trying to load your virally popular content simultaneously. All thanks to someone sharing a single link with their friends on social media.
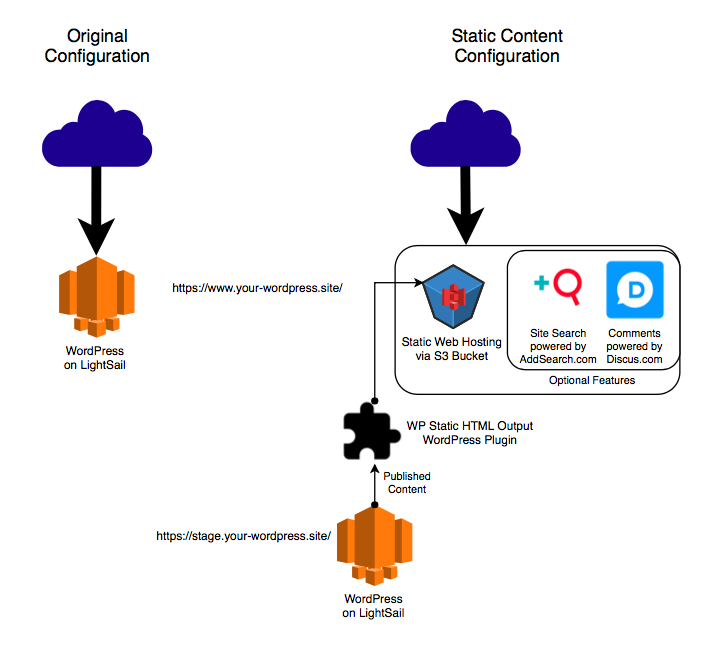
Fortunately, if you can be creative or flexible with your website’s features, there is another option. One that is reliable, resilient, and cost-effective: Static Content Publishing via Amazon Simple Storage Service (S3).
WordPress?
At its core, WordPress is a Content Management System. It makes refreshing your weblog or brochure website easier, and relatively straightforward. It also makes it easier to style your website without completely overwhelming those of us who are not Web Designers or Web Developers.
At the time of the writing of this article, according to W3Techs: “WordPress is used by 58.9% of all the websites whose content management system we know. This is 27.9% of all websites.” Per those statistics, more than one out of every four websites is running WordPress under the hood. WordPress comes packed with several great features, and thanks to its’ popularity, there are over 49,800 plugins to help customize and expand its functionality to suit your particular needs.
Unfortunately, all of that functionality comes at a cost. Serving dynamically generated content requires more resources per viewer request, which makes scaling a website much more complex. Additionally, dynamic CMS must be secured and maintained, lest the websites they create become targets for hackers, botnets, and malware distribution.
Keep It Small & Simple
A good way to eliminate both of these inherent limitations is to reconfigure how you host your public facing website. Switching to a static content publishing model can greatly reduce the workload on your web server, provide a better experience for your visitors, and increase overall security at the same time.
Rendering your WordPress site to static content requires you to make a few adjustments or sacrifices. The Search feature and the Comment feature need to be disabled as they are dynamic by their nature. Fortunately, they can be replaced with external providers, if the functionality they provide is important to your website. There are several options for Site Search, which I will list below, including Google’s Custom Search Engine which is “free” via advertising. For the Comment feature, Disqus, and Discourse are great replacements, even if you do not use static content publishing. If you have any other dynamic content plugins, you may need to consider alternatives or remove those features completely.
Check Twice, Cutover Once
Once you have decided on how to handle the dynamic features of your site, the next steps will be to create your AWS S3 bucket and configure your public facing web hosting. Don’t worry about migrating your website domain name yet, we will configure that once everything is working. Remember to document your S3 Bucket name, and create a new Access Key and Secret Key (or create a separate service account and grant it edit permission to your new S3 Bucket) to use with your WordPress configuration.
Now that you have your S3 Bucket configured, you can setup the WP Static HTML Output plugin on your WordPress site. Configure it to transfer files via S3 to your web-enabled S3 Bucket using the Name, Access Key, and Secret Key we documented earlier. This will publish your entire WordPress site to static HTML and upload it to your S3 Bucket. You should now be able to visit the URL created when you enabled website hosting (http://<bucketname>.s3-website-<AWS-region>.amazonaws.com) and check the content published there to see your website’s front page or a list of files created by the static content publishing. If you see a list of files upon visiting the base URL, you will need to configure the Index and Error documents for your S3 website hosting to display your website’s home page and a custom error page. If you do not see any files, you will need to verify your settings for the static content plugin to transfer files via S3.
With your site successfully published to the S3 Bucket, you are ready to migrate your domain name DNS to Amazon Route53, make the S3 website hosting into your live public website, and convert your original WordPress to your staging site. This can be a little tricky with a live website, but if you focus on making sure the S3 Bucket is working properly with your custom domain, you can configure your local hosts file to allow your computer to access the WordPress host temporarily in order to configure it for the new staging URL (ex. http://staging.your-wordpress.site/).
Wrapping Up
There are a few extra steps you can consider at this point to further secure your WordPress staging site. Restricting public Internet access or removing public access completely via VPN implementation are good options for protecting your website from hacks and harm. You also have the option of implementing Amazon CloudFront CDN should your site become even more popular or you want to further improve load times.
As promised, here are a list of resources to help you migrate your WordPress site to utilize this design:
Search Replacements
- AddSearch – http://www.addsearch.com/
- Algolia – https://www.algolia.com/
- Amazon CloudSearch – https://aws.amazon.com/cloudsearch/
- Cludo – https://www.cludo.com/
- Google Custom Search Engine – https://cse.google.com/cse/
- Swiftype – https://swiftype.com/site-search
Comment Replacements
- Disqus – https://disqus.com (https://wordpress.org/plugins/disqus-comment-system/)
- Discourse – https://www.discourse.org (https://wordpress.org/plugins/wp-discourse/)
Helpful Plugins
- https://wordpress.org/plugins/static-html-output-plugin/
- https://wordpress.org/plugins/static-static/
- https://github.com/kennu/simply-static-s3
- https://wordpress.org/plugins/staticpress/
Resources
- http://www.slowping.com/index.html%3Fp=76.html
- http://www.allthingsdistributed.com/2011/02/website_amazon_s3.html
- https://aws.amazon.com/blogs/aws/host-your-static-website-on-amazon-s3/